Sew it begins….

About a year ago Brad and I purchased our Sailrite sewing machine.  Between now and then there have been (many- but who’s counting?!) fabric purchases, remnant ransacking and plenty of seam ripping going on…and successful projects as well.

At first we started out with easy projects- zip up pillow covers and zipper pouches.  Each were a lot of fun to shop for, and great experience.

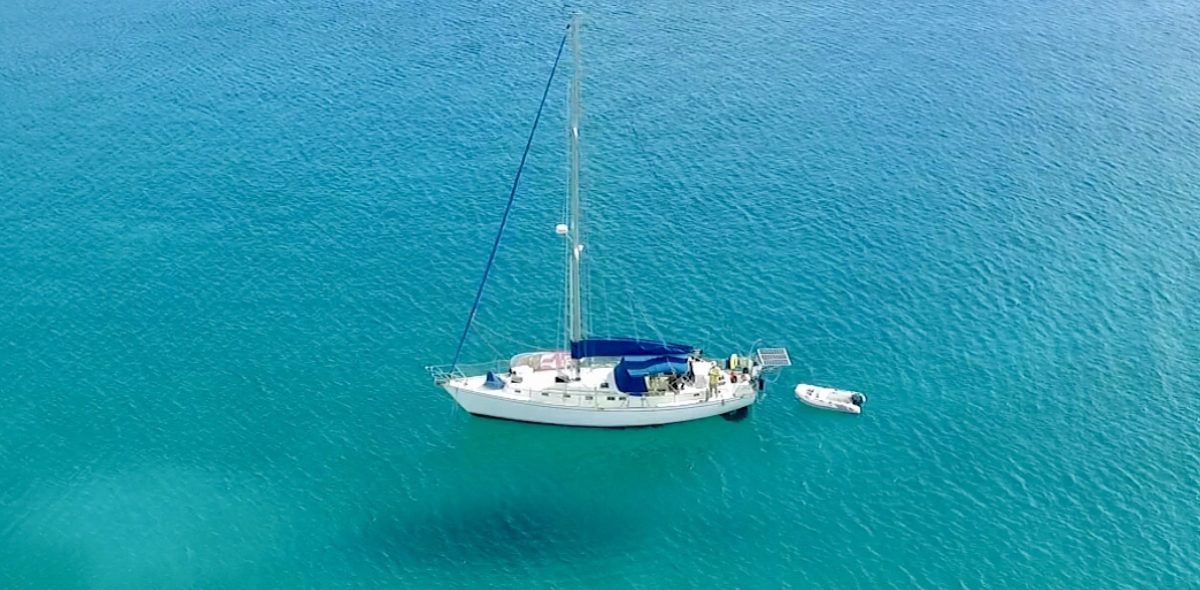
Brad had just purchased new sails for our boat and the sailmaker had an option to build the stack pack for us.  We would save around $800 to do it ourselves so we thought we would give it our best shot.  Lucky for us, Sailrite has an extensive selection of how to videos and ready to go kits just for the job.

Some of you may be wondering what the heck a stack pack is.  Let me explain.  A stack pack and lazy jacks act as a cradle for the mainsail.  When the mainsail is not flying, it needs to be dropped and covered.  The lazy jacks help contain the sail as it makes its way down the mast and into the stack pack.  Once the sail is completely down, the top of the stack pack zips up providing UV protection for the sail.  Pretty neat, eh?!

Once the sails arrived we were able to get to work.  We set up the mainsail, took measurements and started our project.  The way we had measured called for us to add an additional panel to each port and starboard side.  Little did we know this would be unnecessary, but we learned a fancy new seam trick.

There was an abundance of long seams and hems to stitch at this stage of the project.  Bonus:  I finally learned how to sew in a straight line and gained some serious confidence behind the machine.  We were working with sunbrella, Dacron, webbing, zippers and serious amounts of basting tape.  Basting tape is a miracle from the sewing gods- also available for purchase at Sailrite!

Brad was the master problem solver/tool man during this project and always found a way to make things work.  Just like I can never have enough fabric, he never have enough tools. ?  The right tools for the job make all the difference.  We found ourselves using our hot knife and soldering iron quite a bit.  

We completed our first attempt and took the finished product to the boat for a fitting.  At this time Brad and our friend Jesper set up the lazy jacks, attached the stack pack and raised/flaked the main.

What we discovered is that we were a little too ambitious during our first measuring attempt.  The cover was much too big!

Feeling a little defeated, but not in total despair, we took the time to reflect on what changes we wanted to make.  Brad had the brilliant idea to pick up some slides for the pack to slide into the boom track.  This would keep the stack pack attached to the boom evenly.

We were short on slides so we headed to a local sail loft to buy a few.  During our visit we were shown a professionally done stack pack that was fully lined with Dacron, fully enclosed and equipped with straps to roll the pack up while you’re out sailing.  We decided not to fully line with Dacron at this time, but did decide to attach the roll up straps to our new and improved pack.

It was back to the drawing board.  We knew the improvements we wanted to add, but needed to figure out exactly how it was all going to work.  Brad completed diagram after diagram until he was satisfied with our new plan.  We cut the bottoms of our panels and started from scratch.  The modifications took one day and we were ready for our second fitting.  We also created our mast boot at this time.  This portion wraps around the mast and attaches to the port/starboard sides of the stack pack via zippers.

Brad and I put the mainsail back on again, reattached the jack lines and hoped for the best.  We raised the main, flaked it into the pack and liked what we saw so far.  The next test would be to zip the pack up.  We hit a slight snag but don’t worry, it closed like a champ!  Next and final test- would the mast boot fit?  Sure enough it did!  I couldn’t help but to admire our work while Brad checked for things to adjust.  At first the project seemed completely overwhelming, but we took it step by step and won!  Here, take a look…you know you want to!

Sew our next sewing projects on the list are lee cloths, a sailbag for our stays’l, mast boot, windlass cover and probably a few more pillow covers, ya know, for good measure!

Pulling the chain

We’ve gotten way behind in posting our activities. The next few will be out of order as we both catch up and document what we’re doing now.  In summary, the mast is back in, we have all new standing rigging, all new sails–we will tell you all about it soon!

Perspective has 300 feet of 3/8 inch chain, which is great for holding power. Unfortunately our chain is pretty rusted. Rather than spending the $1500 to replace it (~$5/ft), We decided to re-galvanize it ($.75/lb).

Jesper and I tackled that project yesterday, which entailed pulling the anchor and 300 feet of chain. We quietly loaded the 450 pounds of chain into a dock cart, which I’m pretty sure the dockmaster would consider an unapproved use of their flimsy fiberglass carts.  

Jesper then had the brilliant idea to tackle the ramp at high tide, which was the only way our aging bodies would get it up the ramp.

Below is a picture of it loaded in the always handy Home Depot rental truck. As always, I’m very impressed with Home Depot from a cost and simplicity perspective.

In a couple weeks we should have chain that’s good as new!

Thanks as always to Jesper for his expertise and strong back. 

Upgrading the galley stove!

I’m writing this post with mixed feelings.   We have a HilleRange stove/cooktop in the boat that works great.   I even feel it’s perfectly safe, with redundant shut off systems.   (This is nice, as propane is heavier than air, so it sinks into the bilges and just waits for a spark.)   First, ‘one’ can shut off the tank.   If ‘one’ is too lazy to do that, there is a shutoff in the kitchen.  Sounds great, right?   Not if you are an insurance agent.   They want a third failsafe at the burner to shut off the gas if the flame blows out.   So, let’s dig in the wallet and replace something which works perfectly…

Jesper and I pulled the old stove and cleaned the space.   It’s well designed and lined with stainless steel sheet.   It cleaned up nicely and was ready for the new stove.  Notice how the space is curved in the back;  This is to allow the stove to swing when the boat is heeling (aka falling over).

We made a large dent in my wallet and purchased a Dickinson Mediterranean stove, which was reported to bake evenly (oddly a rare attribute) and was well constructed.  It settled in nicely and works like a champ!

At the end of the day, we have a great stove, and more importantly our insurance will cover us if we go ‘boom’ due to a propane leak.

Going up the mast!

Brad took his second climb up the mast and I made my first trip up a few weeks ago.  The idea of going up has always been an intriguing/intimidating prospect for me.  I know it’s completely safe, but I haven’t had much experience with heights before.  So what better way to overcome those anxious feelings than to go up!

Brad had a job to do while he was up- he had to attach hardware to the spreaders to secure our lazyjacks.  My only job was to sit and enjoy the views!  Brad explained the Bosun chair, helped me climb in and clipped me in.  There was no turning back when he started to winch me up.

Let me be honest.  I was a nervous, shaking wreck and my way to cope with the heights was to look straight at the mast in front of me.  Occasionally I would peek down and then look straight at the mast again.  Before I knew it, he had me winched up to the top of our second spreaders. I enjoyed the views at much as possible and managed to snap a few photos!

Overall I am very happy I went up.  I now know that it is safe and the chair is very comfortable.  Having the opportunity to go up at the dock was priceless- better to go there than while out at sea.

We sent Brad up one more time.  Jesper did the winching up, and I released him down.  The feeling of literally having his life in my hands while I let the rope slip through the winch was unnerving.  It’s all a matter of getting comfortable with the process and trusting our new gear, and myself.

For any of you that are curious about going up the mast, you should give it a try.  Just make sure your halyards and hardware are in great shape, your partner understands the process and go for it!

Views from the top!

Sew it continues…

We’ve been meaning to tackle this project for quite some time but never got it done.  We had some sewing mojo/courage after completing the stack pack and decided to finally do this one.  You may be wondering what the said project is, so without further ado…we made a mast boot cover.  Ahhh the suspense is over!  ?

The sunbrella cover protects the tape that stops leaks from the mast to the deck area.  If left uncovered, the tape will succumb to the UV rays and leaks will be knocking on your door…errrr ceiling.

It’s a small project that packed a scary punch (for me).  We had to deal with 2 different circumferences and had to figure out how to make it work.  Brad is the master planner when it comes to these things.  He immediately suggested putting in pleats/darts to solve our problem.  We tried a few practice pleats in the machine and got the technique down.

I cut the fabric to size, hemmed the perimeter and Brad added our pleats.  Before we went any further, I took the cover to the boat to make sure it would fit.  No such luck!       

Not to worry, the fix was simple.  I added an additional panel to each side and sewed the Velcro on to fit.  I made a couple of trips back and forth to the boat until I felt confident to sew the Velcro on.

Now it fits like a glove!

Each project has been a learning experience and I’m happy to be adding sewing to our arsenal of skills. 🙂

Rode Resurrection. 

Revitalizing and re-galvanizing our anchor chain. We mark it every 50 feet and use a clever mnemonic; Rub Your Body With Grease representing Red @ 50′, Yellow @ 100′, Blue @ 150′, White @ 200′ and Green @ 250′ and then red/yellow/red @ 300′ which represents an imminent dive to recover the chain. Much fun is had by replacing ‘Body’ with your favorite word starting with ‘B’.

Perspective in Mission Bay

Brad and I had been itching to take the boat out for a post refit shakedown. We had planned to leave for Catalina on Saturday and spend a week exploring the island, but the boat had other plans. We discovered our windlass had an issue when we cranked up 300ft of chain and heard a strange noise. Needless to say, Brad began investigating and realized our windlass needs to be replaced. That botched our Catalina plan and took up a few days of our vacation. But before you start feeling sorry for us, we did have a great alternative plan brought to us by our friend and rigger, Chris. He suggested hanging out at Mission Bay and using a lighter anchor that wouldn't require a windlass to retrieve (just a strong Brad).

We took care of some last minute provisioning, cleaning and projects and set off Thursday afternoon. This was our first trip of the season, and our first trip with the pups! To say I was nervous was an understatement, but the pups proved me wrong and were just fine. For the first leg of the trip we kept them down below so we could move freely in the cockpit and not be distracted. We took the opportunity to fuel up just before leaving, and attach the new dinghy to the davits.

I steered while Brad hoisted the main and we motor sailed to Mission Bay in just a few hours. The conditions were great and the sea was calm.

As we rounded Mission Bay and came through the entrance, Brad started going over the game plan. First we would circle and get a feel for the anchorage, see what's available and make our move. I was at the helm and he was at the bow with the anchor. I haven't had much experience steering the boat at slow speeds and in an anchorage before so naturally I was a bit nervous. Brad and I have done this scenario before on our BVI trip a few years ago. He guides me right where he wants and instructs port- starboard- reverse- neutral- forward- throttle- idle, etc. All I have to do is listen- and not get things mixed up. 😜

Our anchoring went off without a hitch and we both took a sigh of relief and began getting everything squared away to be on the hook for a few days. We took the pups to shore in the dinghy and snagged a few photos of our girl on anchor. She sure is beautiful!


The girls did great in the dinghy and looked adorable in their life jackets.

We spent a lot of our time carting the girls to and from shore for potty breaks, play time and swimming. We even discovered that Zorra is a hell of a swimmer! I thought we would all take a swim together so I plopped her in the water and zooooooooom she took off straight for shore! She doesn't find swimming as relaxing as the rest of us. Lesson learned!

We kept the girls in the cockpit during the days and moved them below for bedtime. This was our way of combating the extra sand they tracked in- and they were much cooler out in the breeze on deck. Occasionally Zorra would remind us she was keeping an eye on us…

The sunsets were gorgeous and we took full advantage of viewing them from the deck.

Time seemed to fly by and before we knew it, Saturday had arrived. All we had to do was tidy up, pick up the anchor and head back out to sea. Once again the anchoring went nice and easy and we were out of there. Whew! We motored out of the channel and hoisted the main. The conditions were light so we decided to unfurl the genoa and get in some real sailing. We cut the motor and were once again reminded that we have quite an amazing boat. She sails like a dream and cuts through the swells like a champ!
We had such a great vacation and really enjoyed spending time on the boat with the dogs. We have a list of things that need attention but I think we are happier that the list is much shorter than it has been in the past. We are making progress! 👍🏻

Saaaaaaaaailing

A few weeks ago we invited a couple of our colleagues to join us for a sunset sail. It was the perfect excuse to get us off the projects and into the harbor.

The wind was as light as the mood so we took full advantage by filling the cockpit with yummy snacks.

We slowly cruised down the harbor and with each puff of wind we all got to know each other a little better. It was a great time bonding with our colleagues and was a pleasure to introduce them to sailing. ⛵️

We are looking forward to our next harbor excursion together! Until then, cheers!

Varnish be gone!

We made the decision to strip the existing varnish and replace with Semco clear teak sealer. Here are 10 things I learned while going through this process…

1. Bigger is not always better. I mean, was 46ft of boat really necessary?!

2. After hours of sanding, your iPhone no longer recognizes your thumbprint.

3. Timing is everything. Don’t scrape too soon or you’ll make dents in the teak. Don’t scrape too late or you’ll burn the beautiful teak. Either way, it means more sanding is in your future.

4. Bruises are a way of life.

5. Heat guns are really hot- especially when they meet your delicate skin.

6. Teamwork makes the dream work- and the job go much quicker.

7. I have a love/hate relationship with blue tape.

8. If you think you’re done sanding- keep going, you’re nowhere near done! (Yes, Jesper, you made your point!)

9. Shop vacs rule!

10. The process has been completely rewarding and a major team effort! Dare I say….fun?!

While we aren’t finished yet, we are getting

closer and closer. ??

The countdown begins. 38 days until we cut the dock lines

Or at least plan to….   Lots can go wrong, but realistically not much will stop us from making our trip South.   That’s right, we will be quitting our jobs at the end of the month, and heading South with the dogs on October 30th!

These adventures always start with a foolish question:

Foolish question #1:  It all started with Sarah and I a couple of years ago with the question of “Would you like to be on a boat with a few strangers, or have a romantic time with just the two of us?”  That question cost me several thousand dollars in the short term.   We were looking to join a charter to the BVI with our sailing club and had our eye on a Beneteau 42.3.  I had dreams of cruising and wanted to try a bigger boat than our current Beneteau 34.  Long story short, we both fell in love;  Certainly with cruising, and more so with each other.

Foolish question #2:  “What are your thoughts of quitting our jobs and cruising for a couple of years?”   I asked Sarah that question two years ago fully expecting that she would scoff at the idea.   This is the girl that worked two jobs for 7 years to stay busy.   I was blown away when, without hesitation, she said “sure!” with a smirk.   What have I gotten myself into…

And so the not-so-foolish journey begins!!!  We sold our Beneteau in March of 2016.  We purchased perspective in June of 2016.  In July we signed up for the Baja-haha rally.  Now the clock is ticking.   38 days to go.

Where are we going?   That’s a great question that has a lot of variables.   We know we are going to start by sailing in the Baja-haha rally which will take us to Cabo San Lucas.   From there, we expect to spend several months in Mexico, largely Puerto Vallarta and up into the Sea of Cortez.

By March we will need to make a decision.   While we have our eye on the South Pacific, we don’t know if we(Sarah, Sydney and Zorra and I) will want to make a 3,000 mile, 25 day passage.   If we don’t, it will be either staying in the Sea of Cortez or heading South to avoid the hurricane belt.

Now that the cat is out of the bag, we will talk more of our travel plans as the date nears.

Below is a good visual of the route to Cabo.  The rally has scheduled stops in Bahia Tortugas and Bahia Santa Maria.

San Diego to Cabo San Lucas