The motor is purring!

As of yesterday, the motor is in and running like a champ.   It was an interesting experience working with the installer.   The motor is completely electronic.  Part of that scares me, but the inner nerd is very excited.  I have a feeling it will make us revisit the electrical and charging layout.

The guys at VB Engineering are finishing some cleanup tasks and reinstalling all that was removed to clear the engine room.  If all goes well, we expect to sea-trial on Thursday the 18th!!   We are very excited to get Perspective back after 8 weeks and get to work on our personal refit list.

Busy Busy Bees

Things have been a bit crazy here and we have been ignoring the blog.  That’s changing now that we are in the water and running.  What have we been up to?

Engine installation:
The motor mounts took a bit of time to get right which delayed us about 10 days.  By the time the motor was all bolted in and ready to splash, it was Tuesday, August 16th.  All looked good.  The mechanic finished all the controls and tidied up the engine compartment. 

Sea Trial #1

On Thursday August 18th, Sarah and I took the day off for the first sea trial.  We were super excited to have our baby in the water.  It had been 9 weeks in the yard!  We were joined by our mechanic Vince and our broker Andrew.  

Remember the early Star Trek’s where Captain Kirk was pushing the warp engines and the enterprise would almost shake apart, explode and/or unexpectedly disintegrate?   Yeah, well Perspective was that Enterprise on Thursday.  The engine ran perfectly, but there was a horrific vibration that seriously made us worry.  It started at 1200 RPM and built to a crescendo by WOT(wide open throttle).  It was so bad, we couldn’t talk in the cockpit. Suffice it to say, we headed back to the yard. 

Pulling Perspective round 2
The yard was kind enough to immediately pull the boat. Everything “looked” ok;  The prop shaft spun true, the cutlass bearings appeared fine and the prop looked perfect.  Suspecting the prop, we pulled it and sent it to the prop shop and stayed in the sling all night. 


The next morning, the prop shop reported that the prop was perfect.  Back in the water she goes.  

Sea Trial #2

Friday mid-day, Our good friend and Captain Jesper took her back out for sea trial with no improvement.  We started to suspect cavitation as a contributing factor… 

Frustrated and tired of the yard dirt and treatment, we motored back to our home slip.  

The Research Project

Andrew chased down Doug Peterson who didn’t have any input.  He also spoke to the yard and Chuck Driscoll remembered commissioning the KP’s.  They were notorious for cavitation and many had the skeg reshaped to improve water flow to the prop.  Theory #1:  The skeg was disrupting water flow.   

I exercised my google skills and brushed up on my fluid dynamics.  I discovered a cause can be the spacing between the propeller and the skeg.  At this point I remembered that the propeller was too close to the skeg to insert the normal zincs.  Theory #2:  The propeller is too close to the skeg

Vince assured us that the prop is in the same spot as it was previously and was leaning toward Theory #1. 

Pulling Perspective round 3

Vince convinced the yard to give us another pull.  I was out of town and Jesper generously offered to move her to the yard and babysit the inspection.  We pulled her again on Wednesday, August 24th and the inspections began. 


While there was still debate, everyone agreed that the prop was not centered. We ordered a prop saver which would add an insurance to the shaft.  Also, the skeg shaping had already been done, so scratch theory #1.  Back in the water to await the prop saver!

Sea Trial #3

I arrived back in town Thursday night.  Jesper and I took the boat out with the prop saver installed.  What a difference an inch makes!  Keep your mind out of the gutter.  

The original vibration started around 1200 RPM’s and now started around 2500.  The total vibration was about 75% less–not gone, but definite improvement.  It’s apparent that moving the prop helped and cavitation is a large part of, if not the whole problem. 

I’m still not satisfied, so investigating a larger spacer or a 4 blade prop….  That said, it’s good enough to go to Catalina next weekend!!!!

Other projects completed:

  • Fix forward head which is a vacu-flush which stopped vacu’ing.  Shitty job. Enough said. 
  • Fix dead sump pump–thanks Jesper !
  • Fix fridge drain, not draining. 
  • Fix engine room blower.  
  • Fix propane locker drain. 
  • Fix propane system. New regulator and solenoid–thanks Jesper!
  • Climbed the mast and replaced bulb in steaming light with LED. First of many. 
  • Replace stern light–thanks Jesper!
  • Got the dinghy motor running. Runs like a champ!

Annual Catalina Trip

After all kinds of work and no play, it was finally time to take a fun trip to Catalina. We invited our friends Jessi, Jesper and Sean to make the voyage with us. This would be the first time we’ve tested our new motor out on the open seas. But before we could dip in to the fun jar, we still had a few things to tidy and finish up.

First order of business, we had to get the boat cleaned up from being in the yard for 9 weeks. Let me tell ya, the boat was a MESS! Not only did we have dust and debris all over the place, we also had tools ALL over the place. I won’t mention any names, but I do believe they belonged to a handsome gentleman that I call, Captain. It’s OK though, lots of tools are better than no tools at all. We had a few weeknights to address each dirty space from top to bottom. It felt so great to finally get her cleaned up and to her former glory. The previous owners did a superb job of keeping the interior in tip-top condition; she cleans up really well even 30 years later!

Brad and Jesper feverishly worked on last minute projects to have the boat ready for the trip. One of the projects included a climb up the mast! This made me extremely nervous because we had no idea how strong the running rigging on this boat was.   Even with a redundant safety line I still felt uneasy watching him inch his way up the mast. But rest assured, he handled business up there and came down in one piece. He even liked it! Hopefully I can say the same when I make my trip up the mast.

img_9023

I was also in charge of putting away all the food/drinks that Brad bought the night before. He always does an amazing job of provisioning for our trips; we never go hungry! Perspective has ample storage for food; we have a large refrigerator, a separate freezer, deep cupboards, and plenty of storage under our settees. Surprisingly the only thing we put under the settee cushions was extra beverage cans.

img_9013 img_9014

Ok enough about getting things ready, it was time to get this boat out of its slip and on her way to Catalina! We set a personal record of getting out of the harbor at 7pm with plenty of daylight left to navigate around the kelp beds outside of Point Loma. I don’t know about everyone else, but I certainly had a nervous/excited feeling in my gut because this was our first major outing since the boat had been in the yard. It was time to put their work to the test!

image image

The five of us caught up about life in the cockpit while the sun went down and the darkness began to surround us. We decided on a watch schedule and yours truly went to bed at 8:30pm, can you believe that?! Sean took the first watch, from 9pm to 12am, Jessi and Jesper gracefully accepted the 12am-3am shift and Brad and I took the 3am to dawn shift.

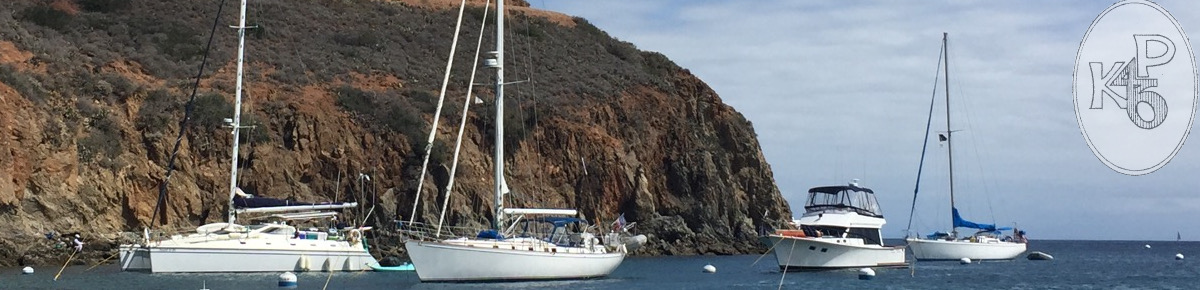
Each of us had an uneventful shift and we ended up plowing our way to Catalina in record time, 11 hours! Upon arrival, we radioed the harbormaster to see if any mooring balls were available. No such luck. Instead we were left to find room in the anchorage. After doing a pass through we decided on a spot to put the anchor down. We put a bow and a stern anchor out as the other boats around us were configured this way. This was our first time being on anchor in Two Harbors and it wasn’t too bad! We did have a northerly swell hitting the boat that ranged from a vigorous rocking, to a calm, rock-a-bye baby motion. We spent Saturday catching up on sleep and eventually made our way to shore in our dinghy!

image

image

We shall call Saturday evening “Things that go bump in the night- part 1”. You know the northerly swell I mentioned? Well, it was rocking and rolling at times and things were making all kinds of noise. I am pretty sure Brad and Jesper hardly slept that night trying to locate the source of each noise, keeping their fingers crossed the bumps and bangs weren’t another boat coming to say hello. Turns out some pesky water jugs were one of the culprits!

We survived the night and Sunday was upon us. We headed to shore in the morning to rent some diving gear for the boys and to check on the status of any open mooring balls. We were in luck- there was one ball available and it was in a fabulous location! We gracefully accepted the mooring and headed back to the boat to pull up the anchors and grab our new ball. Catching the mooring ball was a success and we all took a deep breath because being on a mooring ball is a little more reassuring than a busy anchorage.

While the boys geared up for their dive, Jessi and I made our way to shore to hike and grab some killer views of the boat from the hillside. With each step up the hill we were rewarded with even better views of the harbor. The shallow water was a light crystal blue, every now and then you could see orange glowing blobs aka garibaldi, swimming and going about their day. When we felt like we had stretched out our legs enough, we decided to turn back and head to the shore bar for some beverages. The boys later caught up with us and told us about their dive. It sounded like they had a fantastic time! This was Jessi’s last night with us as she was unable to take extra time off from work. We found it appropriate to enjoy her last dinner with us on shore. With full bellies we headed back to our boat to play some cards and chat the night away.

186a2280-2

186a2320-5

186a2322-6

Fast forward to Monday morning at 3am, we were awakened to the sound of a thunk and some yelling. This is called “things that go bump in the night- part 2”. Turns out our neighbor on our port side got a little too close and we collided. Luckily the damage was minimal, but the situation was a bit jarring to say the least. We turned on our radio and heard reports of other boats having the same problem due to the spring tides. Coincidentally this neighbor provided us with hours of entertainment the day before and most of Monday as well. It was an ASA 104 course in action with an instructor that didn’t appear to be too bright.

We headed to Avalon at 6am Monday morning to drop our dearest Jessi off. Each of us felt exhausted from the drama just a few hours before, and we were sad to be losing Jessi! But before you start feeling too bad for us, we were completely spoiled by a stunning sunrise off our port side; it was BEAUTIFUL! To make matters even better we spotted a few dolphins as we approached Avalon. The morning couldn’t have gone any better!

186a2381-11 img_9019

After saying our goodbyes to Jessi we headed back to Two Harbors. The wind was nonexistent so we were once again forced to motor. We felt bittersweet about seeing our portside neighbor still there. They did provide endless entertainment, but we were hoping they would have left already. Monday was kind of a wash overall and things weren’t the same without Jessi around to help me deal with boys and their antics. Speaking of wash- we took our first “showers” of the trip Monday evening. We were unsure of the status of the shower drains inside the boat, so we took matters outside. I soaped up inside the dinghy and rolled off into the water to rinse, then took a fresh water rinse with the aft deck shower on board. The experience was wildly funny and completely rewarding!

Tuesday was our last full day in Two Harbors and the boys had plans to take their last dive of the trip. While they were away I had the boat to myself and managed to tidy things up a bit and enjoy some sun on deck. It was shaping up to be a beautiful day! From the sounds of it, they had a wonderful dive along bird rock and were full of smiles upon their return. We devoured a quick lunch on board followed by a snorkel along the cove. During the snorkel we came across a school of anchovies, a handful of garibaldi, and even a small horn shark. My favorite was the school of anchovies; the way they moved through the water was magical, I’d never seen anything like it!

img_8789

img_9022

Sean cooked up a delicious dinner and we all decided a mellow night would be best. Sean did most of the cooking on the trip and kept our bellies very happy and very full! Our plan was to be under way at 5am Wednesday morning. When morning rolled around Brad put me in charge of handling the boat while the boys unhooked us from the mooring ball. You could definitely say I was nervous! The sky was pitch black we had a bit of fog, which made visibility very poor. With some guidance and a lot of coaxing, we were out of there! I handed the helm over to Brad after we rounded the harbor and went down for a nap. I had some nervous jitters to sleep off.

I woke to the motor easing up; I hopped out of bed as quickly as possible because usually a slow motor means something awesome is out there to see. This time there wasn’t anything amazing to see, but instead we were slowing down so we could plan our entrance in to Avalon to refuel. Brad checked our fuel tanks and determined that we needed to refuel before making the long trip home. The fuel dock didn’t open until 8am so we had some time to kill. When it was time, we did some tight maneuvering and got ourselves tied up to the dock. Whew!

Now it was time for the long motor back to San Diego. The wind was light at best for the majority of the trip home. We did take full advantage of some stronger winds as they came along and put all the sails out. Once again Perspective surprised us with her ability to glide through the water at such a quick pace! We kept the sails up for a few hours until the winds died down and then furled them all back in. We motored the rest of the trip while Brad made a list of the things we needed to fix when we returned. We discovered a few new noises, and as Brad mentioned, the prop cavitation wasn’t completely gone so that is still on the list. In addition to that we have some serious plumbing work to be done and I suspect some new toilets will be at the top of the list.

186a2458-25

186a2452-24

186a2466-29

186a2464-28

When we arrived back to San Diego harbor we felt a little defeated by the list mentioned above and were ready to get things cleared off the boat and get home. Overall the trip was amazing but we definitely have some work cut out for us!  Stay tuned!


Plumbing projects part 1

The engine is running well and we have ordered the spacer to shift the prop another 1/2 aft.  We are hoping that will further reduce cavitation…  

I had a small project running a broken water line to the aft head.  Not a big job, but the source fitting was burried behind the motor.  Luckily I have long arms, but it still required about 30 minutes crawling on the motor and squeezing myself into way too small spaces. 

After pulling the vacuum pump on the forward head again, I decided to decommission the vacuflush. We don’t need the complicated system, nor do I want to maintain it in the future in some third world country.  Out with the old!


I’m rebuilding all the plumbing from scratch. I learned through this process that the holding tank vents are plugged and the vent hose is rotten. I was surprised that all vents run to the transom which should have been obvious….  keep those smells out of the boat.  This meant I needed to replace about 50 feet of vent hose. The positive is that there is conduit to make running easier.  The downside is that I can only run 3/8″ ID hose, which is smaller than I would like.  Such is life.  

current plumbing including leaky manual pump
Tracing the holding tank vents

We have ordered the hose and two new toilets.  We went with Lavac and are excited about the robust and proven design. They use bilge pumps as flushing mechanisms and rumor has it they have successfully  flushed a teddy bear (try that on perspective and you will retrieve it from the holding tank!!!). They will arrive Friday and I’ll have a great weekend on the boat installing two new heads. Yeah!

Moving!

Sarah and I have been focused on moving for the past several weeks.  We started by moving Perspective from Sun Harbor to Harbor Island West.  We really liked how new and clean the marina is at Sun Harbor, but they have 2-boat slips and are next to the fishing fleet.  With our developing docking skills and the long work list for the boat, we decided our own slip would suit us best.  Additionally, our ‘first’ perspective was at Harbor Island West and it felt like home. 


We are also moving house to be closer to Perspective.  The plan is to downsize a bit and to reduce the commute to the boat.  We will be in Point Loma by Halloween!!!

Forward head is complete!

I’ve been lazy with postings and finally catching up. 

We completed the head install about 3 weeks ago with the exception of final vent fittings and cosmetic touch up.  


Lesson number 1:  Venting

Venting should not be overlooked.  The original vents for both heads are made from old plastic tubing that became very brittle over 30 years of exposure to holding tank gasses.  They were broken in several places resulting in unsavory smells… All lines need replacement.  We decided to upsize the original 3/8″ line and go with 1/2″ PEX to increase airflow.

This sounds easy, right?   The boat was designed well with all venting leading to the transom.  The theory is that this keeps all holding tank gasses out of the boat and cockpit.  On a 46′ boat, this means you have a vent line running almost 50′.  There is a conduit which was helpful (which was the limiter on ventline ID), however it was in 3 non-contiguous sections.  That means you take apart a lot of the boat to run the lines.  

The line is run and I just need to connect to the holding tank with a new thru hull. 


Lesson #2:  KISS

We went with Lavac toilets as we liked the simple design.  Easy to service and all pumps are based on common components. Rumor has it that the toilet has survived flushing stuffed animals (had to be tiny) through it.  

The plumbing was not so simple.  We created an all new system that included:

  • Vented loops on the saltwater inlet and head outlet.  Lavac toilets use vacuum to pull in saltwater for the flush and need a vacuum break.  The head outlet vacuum break stops your boat from sinking if a siphon forms while configured to dump overboard…   this wasn’t needed on the previous toilet.  
  • Flexibility in waste management.  Have 4 paths for our poop.  Head to direct overboard (for offshore use), head to holding tank, holding tank to pump out and holding tank to overboard via manual whale MK5 pump.  Two pumps, two Y valves and no power required. 
  • Common pumps.  The toilet flushing pump is the same model pump used to pump offboard from holding tank.  Common parts equals less spares.  With the aft head, there will be four in total. 


Note the pvc to hose ‘barbs’. I used SeaLand hose adapters and love them.  Available online or at SeaLand/Dometic dealers  for about 3 bucks, or West Marine for 19.99. 


We are excited to have a working forward head again and can’t wait to start on the aft head. 

Lesson #3: crappy 80’s plastic

During the plumbing project we discovered that the same brittle plastic lines are used for all the cold water lines, water tank vent lines and fuel tank vent lines throughout the boat.   How did we discover this?  We shattered one under the sink in the forward head while pulling sanitation hose.  We also had a mystery puddle after filling the water tanks.  They are all on the replacement list. 


Stay tuned for more plumbing fun after our next project….Rigging!!

Dropping the sheets

We have a confirmed date of December 14th to pull the mast!!!   

In preparation for this, we need to remove the sails, disconnect the wiring and any extraneous running rigging.  

I have owned two boats and never needed to remove the sails and both Sarah and I were excited to tackle the project. 

We started with the mainsail.  Perspective was upgraded some time in its past to a furling main via a bolt on behind the mast Foreapar EZ-Furl system.  It had a warped worm drive and we wanted to return to a traditional stack pack main sail.  

We pulled out the main and began inspecting the system. It was relatively intuitive, so down she comes!


The main is in great shape, but not usable in the new system.  I’m sure Sarah will find creative uses with her Sail Rite sewing machine. 

The wind picked up and we dropped the staysail and jib the following morning. It was a fun and educational exercise. 

We also pulled all the wiring from the mast.  It’s all due for replacement, so very straight forward.  


We are learning more about the boat every day.  It’s lots of work, but great fun!

Polishing our pole

Our mast has a fair amount of surface and bi-metal corrosion.  This is very normal as it’s painted and has lots of stainless drilled into the aluminum.  We decided to go back to basics and strip the mast and keep it aluminum rather than repainting.  This would save us some money at the expense of our labor, and in theory be lower maintenance.  

The downside of bare aluminum is that it oxidizes.  Some people don’t like the look, though the oxidization creates a stable barrier to the elements.  I’m fine with the ‘look’ but as I’m stripping the paint anyway I was guided by Chris at C.C. Rigging to polish and wax the mast.  This will make it shine and the wax will slow the oxidation.  

So began my Christmas holidays and two weeks of stripping, sanding, buffing and polishing.  


We discovered that at some point in its life, someone took an angle grinder to the mast presumably to remove some hardware.  Very disappointing, but I sanded most of it out over a day or two. 


Here is a good progression of the mast. 


Notice that shine!!!!

It was a fun exercise;  I enjoyed the manual labor and I picked up new skills.  I purchased a Makita polisher for the project.  It was a handful, but it will come in handy for future gel coat projects.  

Installing the mast deck collar

For those of you who are non-sailors, our mast penetrates the deck and is ‘stepped’ on the keel.  Where the mast penetrates the deck, there is a metal collar to reinforce the area and stabilize the deck. 

Our old mast collar was completely corroded.  The aluminum actually discintigrated when I was trying to remove it.  


We had a new collar fabricated by Benchmark  Welding.  It was both a work of art and very sturdy.  

Sarah and I installed it this weekend.  It began by filling the existing holes as we changed the pattern to bolt into clean fiberglass. I haven’t played with fiberglass since college and had quite a bit of fun. 


We let this cure over night.  

The next morning, sanded and cleaned the area with acetone.  We marked the new hole pattern and began drilling.  The first hole was stressful.  It’s amazing how fast a sharp drillbit will go through 3/4″ fiberglass.  

I applied a good base of 3M 4000UV as bedding material and bolted it all together.  All in all, easier than I though to install. 

Holes drilled and dry fitted
Applying plenty of 4000
Evenly tightening the bolts
Drilling out the 1/2 in hole for the deck tension thingy
Finished product looks pretty good!!